
This is a workshop cooperation. Start by drawing some pictures, in order to decide what you want the tadpole to look like. Next, you must take a large amount of clay and give shape to your idea, building a life-size model (if you want, to save clay, you can take a thick wooden block and put the clay on top). It must give shape to all the details: the eyes, the eyebrows, the mouth, the nose, the hair, the cheeks, hats, scarves ...
Once the model is finished we will let it dry superficially and cover it with plaster to make the mold. You will have to buy a few rolls of plaster bandage (you will find them in pharmacies). First, smear the head that you have modeled with Nivea type cream, because later the plaster will come off easily. Then you have to cut the bandage into strips; These strips are soaked in water (put a basin nearby) and placed on the head, well and marking the shape of the mouth, nose, eyes, hair ... When the entire tadpole is covered in plaster by a layer thick enough, we will let it dry for 10 minutes and then we begin to remove it very carefully, and we put it to dry as long as it takes until it is very dry.
Obviously you must be asking, how can I remove the plaster if the entire end is covered with it? The answer is that you need to make two casts: one for the front of the head, and one for the back. Paint a line on the clay head to see where one begins and the other ends. Once finished, the two molds should fit together perfectly. Each plaster castOnce dry, it is painted on the inside with synthetic enamel (this makes it easier to remove the mold).
Once the plaster and paint have dried, these molds are used to put the strips of papier-mâché or cardboard-stone on the inside (see the previous technique, for more safety, you can spread the inside of the mold with Nivea to facilitate demoulding). When the entire mold is covered on the inside with enough layers of paper, we will let them dry for several days and then unmold the papier-mâché separating it from the plaster.
The next step is join the two pieces they have come out of the molds. We do this on the inside with duct tape and on the outside with papier-mâché. Now we have the opportunity to do some more touch-ups on the figure with more papier-mâché, and to correct the imperfections (it can be done with putty, which we then polish with fiberglass).
During the placement of the paper you think to leave the hole free where we will look. It is usually the mouth of the tadpole. If the hole is not perfect, you can finish outlining, very carefully, with the help of a cutter, and then just touch up with papier-mâché. This hole is usually covered with black mosquito netting, held on the inside, so that the person carrying the tadpole can see through the mosquito net, but people outside only see the black color of the cloth.
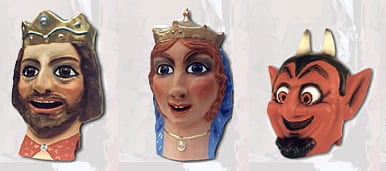
The last step is painting. It is usually done in several layers:
Primer or insulating layer
Base colors
Brush details
Protective layer with transparent varnish or with white glue diluted in water
And that's it! It only remains to complement the tadpole with a suitable costume.
The advantage of this technique is that it allows you to make several identical copies of the same figure from the mold.
Source - Crafts