
Hello everybody. We start a new month and here we renew decoration, in this case with some original rubber butterflies eva what we will learn to do in this DIY
In this post I want to show you a project that I have been preparing for months and that has made me very excited to carry it out.
Decorative butterflies made of eva rubber for decorate a wall in a girl's room. In this post I show you a very entertaining and very nice step by step to do.
Materials to make eva rubber butterflies
- Assorted eva rubber.
- Scissors, pencil, marker.
- Cardboard and folios.
- Double fastener tape or wall glue.
Procedure for making eva rubber butterflies
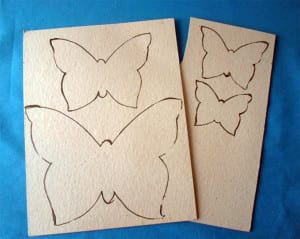
The first thing we have to do is find the drawing that we like the most and make a cardboard mold. I chose a butterfly and made several different sizes.

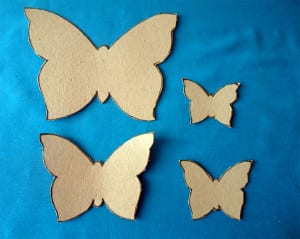
After we have the mold of the decorative butterflies prepared and cut, the next thing is to transfer the drawing to the eva rubber. In my case, I chose eva rubber of different textures and colors, I used velvet, textured, shiny and smooth normal eva rubber. I used several colors since I wanted it that way but that is to the taste of each one and according to the work you want to do.

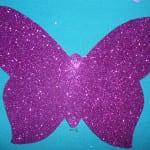


I have cut about 15 eva rubber sheets in total to make these decorative butterflies, but as I said before, the amount depends on the work we want to do.
When we have all the decorative butterflies cut out, what follows is to place them on the wall or in the place that we want to decorate. In my case it was a wall and what I used to glue them was double fastening tape and for the larger ones, contact cement for the wall.
In my case I was placing the decorative butterflies in ascending size, that is, the smallest first and last the largest. I also used decorative butterflies to put in some places like closet doors or windows to harmonize the total decoration of the room.
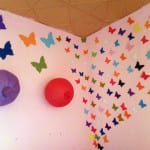
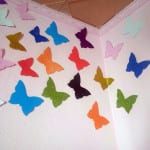
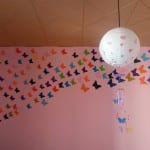

The wall has remained as you can see in the images in the last image gallery.
This project is not very complicated and we can do it in a day if we propose it, although I have considered it calmly and I have done it with enough time.
I hope you like the tutorial and that it inspires you to make your own decorative eva rubber butterflies. Do you want more crafts? Do not miss these eva rubber flowers so pretty and easy to do.
Leave me your comments!